
Understanding how to resolve QuickBooks firewall error codes is not a hard nut to crack if you know the right steps. Basically, this error occurs in your QuickBooks application while opening the QuickBooks Company File.
And we will be sharing a lot more information about this QuickBooks Firewall ports issue. You will get to know what it is, why it occurs, and step-by-step instructions for solving it. Are you ready to explore them all? If yes, then go through this post till the final conclusion.
Table of Contents
What is Quickbooks firewall Error?
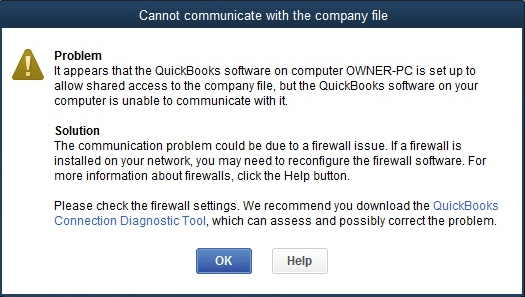
QuickBooks firewall issue is one of the most common QuickBooks errors that usually occur while using the QuickBooks company file. This error disrupts the communication between the QuickBooks company file and the QB application. When this QuickBooks error pops up, you can see the messages similar to:
- “Windows Firewall is blocking QuickBooks”
- “QuickBooks error Windows Firewall disabled exceptions not defined”
Also Know: How to Resolve H202 Error in QuickBooks? (Instant Solution)
Then Check: How To Resolve QuickBooks Error H505? (Troubleshooting Guide)
Why Is QuickBooks Firewall Error Bothering You?
The QuickBooks firewall issue may bother you due to ample reasons. Let us explain to you a few of those causes. Here are they:
- You may encounter this error in the situation when the QuickBooks firewall ports are closed. In such a case, the ports used by QuickBooks will not be forwarded by the system for accessing the internet.
- Another reason for this QuickBooks firewall error Windows 10 could also be a third-party antivirus that might block the application permanently.
How To Resolve QuickBooks Firewall Error?
Ultimately, we will now be revealing some best solutions for fixing a firewall issue in QuickBooks. If you are eager to know how to resolve QuickBooks firewall error codes hassle-free, then follow the below-mentioned steps.
Solution 1: By Setting Up The Firewall Ports
For allowing the QuickBooks application to access the internet, it becomes essential to set up the QuickBooks firewall ports. Although they usually get automatically configured after downloading them, you can follow the enlisted steps if they don’t:
- First of all, tap on the “Port Monitor” tab after launching the QB Database Server Manager.
- Jot down the “Port Number” listed for your application.
- Hold the “Windows” + “I” to open the settings and then hit a click on the “Update & Security”.
- Choose the “Windows Security” tab from the left pane and then click on the “Firewall and Network Security” option. Choose the Advanced settings button from the list.
- A new window will appear, tap on the “Inbound Rules” option and choose “New Rule“.Later, click on “Inbound Rule” and then select the “New Rule”
- Choose “Port” and hit a click on the “Next” button.
- To specify local ports, click “TCP” before selecting the “Specified Local Ports”.
- After that, tap on the “TCP” option and then the “Allow the connection” option
- Now, add a “Name” for the new rule.
- Once you write the name, click on the “Finish” option after selecting “Next”
- Repeat the same process for outbound rules too.
Call Us For Instant Solution: 8447363955
Step 2: By Running QuickBooks File Doctor
Another way for troubleshooting a QB Firewall issue is by running the QuickBooks File Doctor tool. Let’s check how.
- The first step is to download the QuickBooks File Doctor from the official site of Intuit.
- Once the setup file has been downloaded, you can install it by running the qbfd.exe file.
- Afterward, select the file that needs to be diagnosed and run the QB file doctor
- Wait until the QuickBooks file doctor scans the file.
- Upon completion, restart your system
Also Read: How To Fix QuickBooks Error 6000 83? (Troubleshooting Solutions)
Solution 3: Update the QuickBooks Application To The Latest version
One more solution is to update the QuickBooks application to the latest version. Following are the steps that you must follow:
- To get started, you must click the Help menu on the QuickBooks desktop
- To update QuickBooks, click the Update QuickBooks button
- On this page, click on Update Now.
- Once you have completed all the steps above, you must checkmark the box under Update now.
- In order to reset the update, you must delete all downloads of the latest updates. By doing so, you can reduce the update time.
- Select Get updates from the options that appear.
- A QuickBooks update will be downloaded automatically if it is available.
- Once the update installation is complete, the user must restart the computer
- Allow all options for installing the new version while restarting your system.
Call Us For Instant Solution: 8447363955
Final Thoughts:
All in all, you know everything about the Firewall issue in QuickBooks. You know how to resolve QuickBooks Firewall error, what it is, and why it occurs. Still, you are free to call our QuickBooks experts whenever you need any technical assistance.

